Touch
// #include "http://www.byvac.com/mBlib/flb/Library/2016/lib_touch.bas"
The MX1 has specialised hardware that can be used for creating touch input pads. The pads can be on a PCB or even a simple piece of tinfoil with a wire taped to it. The beauty of this system is that the pad can be placed behind plastic or glass giving a hidden or smooth user interface and can be decorated with the application of an ink jet printed front panel.
The initialisation needs some values before use so here is an example for using PORTB pins 0 to 3, the ADC channel also needs to be known for these ports, look them up here.Port B PIN ADC Chan
0 2
1 3
2 4
3 5
// Touch pad example using PORTB pins 0 to 3
//
// #include "http://www.byvac.com/mBlib/flb/Library/2016/lib_touch.bas"
// pad = <port><pin><adc channel>,...
constant PADS {PORTB(PORT),0,2,PORTB(PORT),1,3,PORTB(PORT),2,4 \
PORTB(PORT),3,5}
constant TRIGGER {2000,2000,200,2000}
function test(chan,tol) // set tolerance to 300 for a start
dim raw
cap.init(*PADS(),*TRIGGER(),4,tol) // 4 pads
cap.start() // important
while comkey?(2) = 0
raw = cap.padT(chan)
print "\r\nraw = ",raw
print " cap.get = ",cap.get(chan)
print " trigger = ",average(chan) - raw
wait(200)
wend
endf
The above can be copied to the editor to carry out an initial test. The trigger vales need to be initially guessed, it is the difference in value to when the button is pressed and not pressed. To get an idea if the values chose are okay, the output of the above is:

Here when the button is not touched cap.get = 0, when the button is touched cap.get = 1 and the trigger value is about 54000. This means that there is a 54,000 difference between touch and no touch so for this application we could up the trigger values from 2,000 to make the system more reliable.
Recap
- Create two constants to hold the ports and values
- Use cap.init() followed by cap.start. cap.init() needs the number of pads and also the tolerance
- Repeatedly call cap.get() with a channel number. This needs calling often to keep up the average.
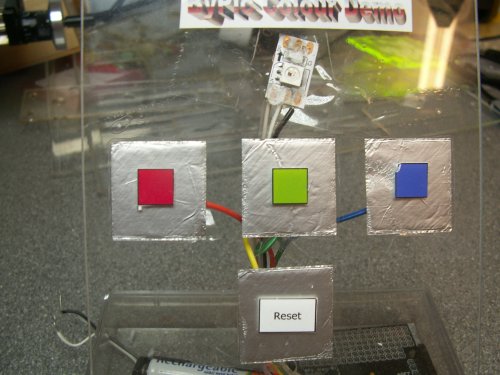
Here is a simple demonstration made out of 2mm acrylic. Tinfoil has been stuck to the back and small coloured squares glued onto the front to act as buttons. It is purposely transparent to demonstrate how it works.
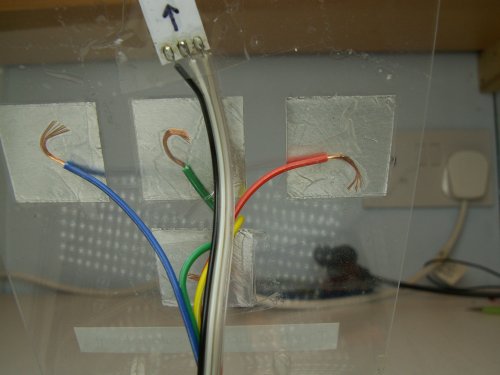
Here is the back view. The wires from the microcontroller are simply taped to the foil using sellotape. Ideally of course a PCB could be used but this method works really well.